Support
AI Agents

Please click here to ask a question, if you can not find a solution to your problem.

CONTENTS
Software Requirements
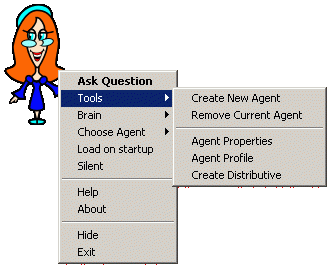
AI Agent Menu
Ask Question
Teach Agent
Edit Answer
Attachements
Web Search
Tools Menu
Agent Creation Process
Agent Removal
Agent Properties
Agent Profile
Agent Distribution and Cloning
Brain Edit
Brain Import
Choose Agent
Brain Export
Load On Startup
Silent
Other TTS engines
Hide
| Back To Top |
Important pre-installation note:
Before downloading and installing AI Agent Application, Microsoft Agent must be installed in your computer. Please click on the image below to download and install first before proceeding:
Microsoft Internet Explorer 4.71.1712.6 and higher, with the exception of beta test versions is required for the successful use of web search in AI Agent Application. If you are currently using an older version of Internet Explorer or would like to download Internet Explorer for the first time, please do it now.
Microsoft Agent. If you do not have it, download it now.
Optional: Microsoft Text-to-speech engine
If you want your AI Agents to be able to speak and read the answers, that they have found, please download Microsoft Text-to-speech engine.
| Back To Top |
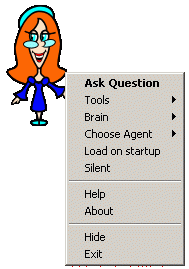
The Agent has an easy-to-use menu system, which is visible by using the "Mouse" and "RIGHT CLICKING" on the agent.
| Back To Top |
Have a question dialog
A dialog box will appear, asking the user: “Have a Question?”
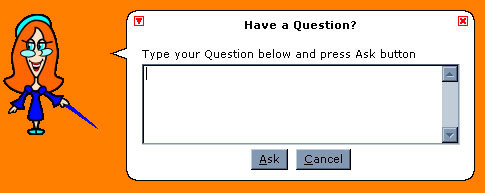 |
The user will then enter a question/word/sentence/etc. and presses the “Ask” button as requested. This will initiate the smart search query within the agent’s brain (database).
Agent does not know the answer
If the agent’s search cannot find a match on what is entered (which is usually the case on a new agent when the agent's brain does not contain information), a dialog box will appear. (See below)
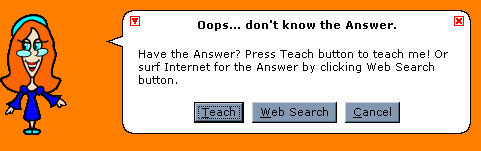 |
If the information has not been found, the user is given the option to:
- Ask another question
- Search for the question on the net using agents embedded online search engines (see above: selecting search engines)
- Teach the agent
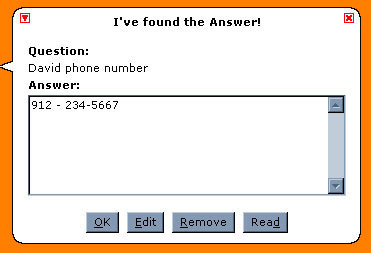
Agent does know the answer
 |
If the agent’s search query finds a match or several matches on what is entered, a dialogue box appears (see below) – indicating that “it has found the answer” in its brain and gives the user the option to either:
- Edit the answer
- Remove the question and answer
- Read the retrieved information (Text to speech)
- Print or Save the returned answer (This is accomplished by using the dropped down menu (red arrow) located on the left/top of dialog box
 |
| Back To Top |
If the agent's smart search cannot find a match on what is entered in "Ask a Question" dialogue (usually the case on a new agent when the agent's brain does not contain information), a dialogue box appears. (See below)
|
The user is able to teach the agent by first entering the information, then clicking on the "TEACH" button.
The "Teach Button" opens a dialog box:
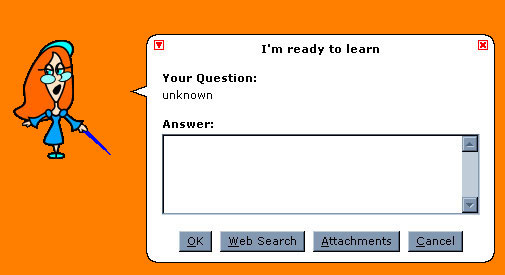
This will give the user the option to:
- Enter the answer directly in the opened box
- Perform an online search to find the answer
- Add attachments to the answer
| Back To Top |
If the agent's search query finds a match or several matches on what is entered, a dialogue box appears (See below) - indicating that "it has found the answer" in its brain and gives the user the option to Edit Answer.
|
Another way to directly edit the agent's information, including both questions and answers is to use the Brain Edit function.
| Back To Top |
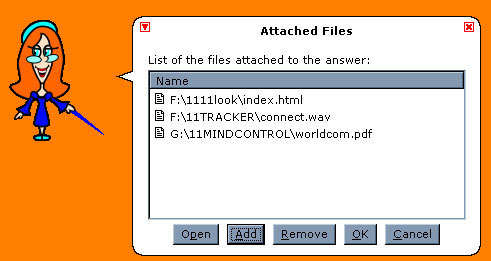
Add attachments to the answer. The attachment button allows the user to add unlimited references to the documents.
** The attachments are residing on the user's PC. Please note that these references are simply a link to the existing documents.
** The attachments could be any kind of information and at the time of retrieval the agent will AUTOMATICALLY launch the appropriate application for that attachment.
 |
| Back To Top |
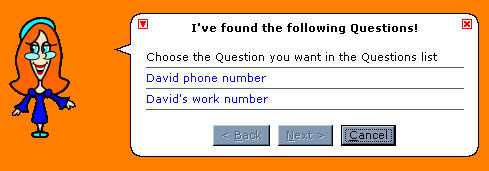
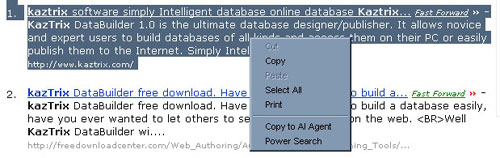
The "Web Search" button allows the user to perform an online search to find the answer:
|
** After performing an online search for the data entered, the user must use the traditional copy and paste function to transfer the discovered information into the input dialogue box.
 |
| Back To Top |
| Back To Top |
Users can create new agents by using the "Create New Agent" Tab in the "Tools" Menu.
Users can create as many AI Agents as they wish. Each agent has its own dedicated brain (database) and characteristics. The user can than switch between these Agents with a click of the mouse.
During the creation process (below), users may input "The creator information" to force/lock ownership of their creation. This includes assigning their name as the owner of the agent and entering ownership properties, such as owner's web site, email, etc.
Owner information
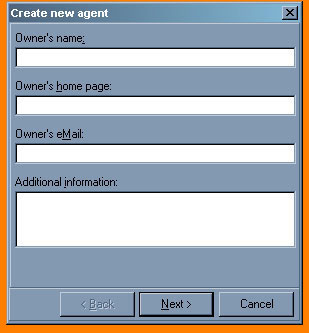 |
This ownership information will always show on the Agents' profiles even if they are distributed to other users.
Selecting agent properties
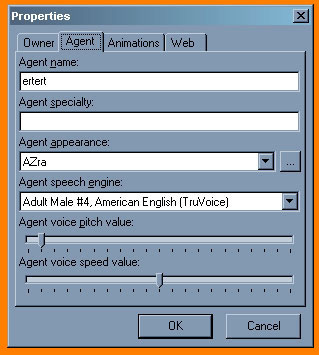 |
Users can also select characters, available within AI AGENT application, or import Characters from available agent libraries on the Internet.
The user may also control the speech mode and properties such as voice and other functionalities of her/his agent. AI Agent is capable of reading the retrieved information using text-to-speech technology.
Selecting search engines
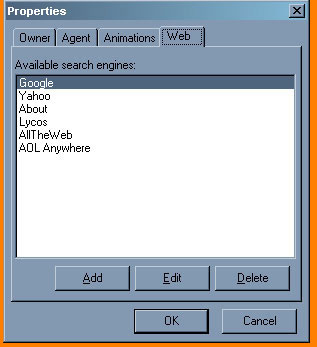 |
Another useful function which is controlled by the user in the creation process is the ability to choose, edit, and select the preferred online search engine(s) that are going to be presented by the Agent.
An AI agent can search the Internet for information, performing direct calls to these well-known search engines.
After the creation of these nifty agents, the loaded Agent will reside on the users desktop. No matter what application is opened, AI AGENT overtops any screen, showing availability and readiness to be addressed.
| Back To Top |
It removes the loaded agent completely (please, be cautious when using this function).
| Back To Top |
This screen allows users to view and change the properties of their agents, such as Ownership Information, Name, Agent Appearance, Speech Mode, Animation, Web Search Links, etc.
|
| Back To Top |
Agent profile shows the information related to the current agent. This is especially useful for viewing the permissions which are selected by the owner at the time of the creation.
Every Agent has its own unique profile that is created by the owner.
 |
| Back To Top |
Create distributive: Send your agent to a friend :-)
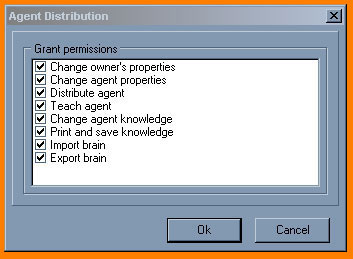 |
This powerful process allows the owner/user to create a CLONE of its current agent, including the brain (information) to share with other parties.
The creator has full control on the distributed version of his/her agent by assigning protective sets of permissions to it.
This creates a CLONED, ready-to-go, installable version of the agent, including the brain (data/information) as a single file (agentname.exe), which is a self-running exe file. This file can be sent to whomever the creator wishes (send your agent to a friend :-)).
This process is aimed to securely create and distribute WANTED information by the Creator. For example if the creator grants "NO TEACHING" when he/she creates a distributive, the recipient who receives the agent, can only retrieve the information and cannot edit/tech/alter its brain. The same restrictions apply to other functionalities of the agent.
| Back To Top |
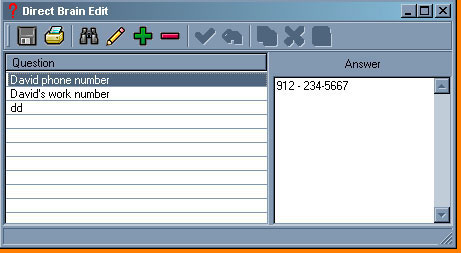 |
This allows the user to easily access and edit the brain of the loaded agent.
This function is designed to simplify the brain entry (data entry) for the agent. When accessed, a full sub-application appears that shows the "questions and answers" that are saved in the brain of the agent. This allows the user to access the data directly and perform tasks such as Edit, Save, Add, Print, Search, etc.
TIP:
If you are planning to Teach Agent and would like to by-pass the time consuming dialogue boxes, you may use direct brain edit to save time, while entering information.
Also if you decide to change a question or answer, you can easily locate them by using the search function embedded in the brain edit function.
Also if you decide to change a question or answer, you can easily locate them by using the search function embedded in the brain edit function.
| Back To Top |
This unique and powerfull function allows the user to import a brain file, which is already exported (see export). A brain file (file.brn) is simply the DATA/INFORMATION of an agent.
When importing a brain, the user has the option to "Merge" the imported brain to the existing one or simply replace the existing brain. AI AGENT allows users to import and merge as many brains as they wish.
TIP:
This function is used to smarten the agents by allowing the users to add knowledge to their agents and merge information that is sent by other users of AI AGENT.
There will be Ready-To-Use brains available at our web-center in the near future: www.aiagentz.com
There will be Ready-To-Use brains available at our web-center in the near future: www.aiagentz.com
TIP:
You may also use this function to RESTORE the information of your current agent (see Export - Backup).
| Back To Top |
Users may create as many AI Agents as they wish. Each agent has its own dedicated brain (database) and characteristics. The user can than switch between these Agents with a click of the mouse.
| Back To Top |
This function allows the user to export a brain file, which already exists. A brain file (file.brn) is simply the DATA/INFORMATION of an agent.
TIP:
This could be used to export information (brain of your agent), so you can send it to another AI AGENT user.
TIP:
You may also use this function to BACKUP the information of your current agent (the brain). The exported brain file is a backup of the DATA of your current agent and can be restored, using the Import function.
| Back To Top |
By selecting this function the Agent will load when the operating systems starts. Deselecting this stops the agent from automatically loading during the startup and The agent must be started either from the desktop icon or the start menu.
| Back To Top |
Selecting this option stops the agent from performing text-to-speech task. If you find the agents speech annoying, simply select this option to turn the speech off.
If Silent option is not selected, but you still can't here any sounds, then perhaps you do not have Microsoft Text-to-speech engine installed. You may download it here.
| Back To Top |
Here is the list of other TTS engines that can be installed and used in AI Agent application:
Digalo Text-To-Speech Engine
Digalo is an affordable TTS engine designed for end-users and developers. The engine is offered in a number of languages: French, German, Portuguese (Brazilian), Spanish, Russian, and UK and US English, with Italian, Polish, and other languages coming soon. You can listen to sound samples and download free trial versions from http://www.digalo.com/agent
Elan Speech Engine
Elan Informatique is a worldwide provider of multilingual text-to-speech technology. It simply reads IT-generated texts out loud, with the flexibility and richness of natural sounding speech. 11 languages & 18 voices are already available (American English, British English, Brazilian Portuguese, French, German, Italian, Polish, Russian, Spanish & Latin American Spanish, Dutch) and new ones are under development. You can find sample sound clips of the engines at the http://www.elantts.com/agent
AT&T Natural Voices
AT&T Natural Voices' TTS Engine can uniquely support the addition of many languages to any and all applications, including U.S. English, German, Latin American Spanish, U.K. English, Parisian French, and many more foreign languages to come : You can listen to sound samples at: http://www.naturalvoices.att.com/demos/index.html
For more TTS engines read http://www.microsoft.com/msagent/otherspeech.htm and http://www.microsoft.com/speech/evaluation/thirdparty/engines.asp
| Back To Top |
When you select hid, the agent will disappear from the desktop screen and will be located On the icon try (usually bottom, right corner of the screen). To show the agent (bring it back to the desktop screen), simply right click on the icon try and select “SHOW”.
| Back To Top |